- Get Involved
-
- Project tools
-
-
- How do I...
-
|
Notice: the projects area will undergo maintenance to enable Project Editor feature Monday, 6/25 from 7:00 pm to 7:45 pm PDT.
 |
|
| TableLayout Tutorial, Part 2 |
| Building Powerful GUIs |
|
| by Daniel Barbalace |
| 06/27/2005 |
|
TableLayout Download
The latest version of TableLayout can be downloaded from
here.
The complete source code for examples given in this article can be
found here -- note that the version
of TableLayout used by these examples is not necessarily the latest
version.
Java Web Start Download
Java Web Start allows you to launch the examples in this article from your web browser. Download
Java Web Start from
here.
Print
A printable Word document of this article is available
here.
| Article Table of Contents |
| |
|
|
|
|
|
Mutlitcell
Spanning multiple cells
In Part 1
you learned about the concepts behind TableLayout and how to create
applications quickly with this layout manager. Now we look at some
more advanced features of TableLayout that can be used to create
powerful applications with ease.
One of the most common techniques for creating layouts with
TableLayout is to have a component span mutliple cells. This can be
achieved quite easily with either a String or a TableLayoutConstraints
constraint. In this example, we will create the following mockup
(figure 1) of the Windows XP networking setup.
The grid that we will use will contain three columns for elements
as well as two columns for a border. For clarity, the rows will be
created explicitly as they are needed. The second figure shows the
rows and columns in the grid.


The textfield spans two columns. The scroll pane (which contains
the list of connection items), both labels, and
both checkboxes span three columns. This is accomplished by
specifying two cells for the constraints. The first cell is the
upper-left corner of the area used by the component. The second
cell is the lower-right corner. For example, the scoll pane
occupies cells (1, 5) through (3, 5). It was added to the container
with the line container.add(scrollPane, "1, 5, 3, 5");.
The scroll pane could have also been added with the type-safe
equivalent line container.add(scrollPane, new TableLayoutConstaints(1, 5, 3, 5));.
Listing 1: Multicell

package example2;


import java.awt.*;
import javax.swing.*;
import java.util.*;
import info.clearthought.layout.TableLayout;


/**
 * Example of components spanning cells.
 *
 * @author  Daniel E. Barbalace
 * @version 1.0, June 14, 2005
 */

public class Multicell
{


	/**
	 * Runs the program.
	 */

	public static void main (String args[])
	{
		// Create frame
		JFrame frame = new JFrame("Local Area Connection - Primary Properties");
		frame.setDefaultCloseOperation(JFrame.EXIT_ON_CLOSE);
		frame.setLayout(new FlowLayout());

		// Items to display in list control
		Vector listElement = new Vector();
		listElement.add("Client for Microsoft Networks");
		listElement.add("File and Print Sharing for Microsoft Networks");
		listElement.add("QoS Packet Scheduler");
		listElement.add("Microsoft TCP/IP version 6");
		listElement.add("Internet Protocol (TCP/IP");

		// Create controls
		JLabel labelConnect = new JLabel("Connect using:");
		JTextField textfieldConnect = new JTextField("Intel(R) PRO/100 VE Network Connection");
		JButton buttonConfigure = new JButton("Configure...");
		JLabel labelUse = new JLabel("This connection uses the following items:");
		JList list = new JList(listElement);
		JScrollPane scrollPane = new JScrollPane(list);
		JButton buttonInstall = new JButton("Install");
		JButton buttonUninstall = new JButton("Uninstall");
		JButton buttonProperties = new JButton("Properties");
		JCheckBox checkboxShowIcon = new JCheckBox("Show icon in notification area when connected");
		JCheckBox checkboxNotify = new JCheckBox("Notify me when this connection has limited or no connectivity");
		JButton buttonOK = new JButton("OK");
		JButton buttonCancel = new JButton("Cancel");

		// Create and set layout
		double p = TableLayout.PREFERRED;
		double border = 10;
		double emptySpace = 10;
		double [] columnSize = {border, 1.0 / 3.0, TableLayout.FILL, 1.0 / 3.0, border};
		double [] rowSize = {border, border};
		TableLayout layout = new TableLayout(columnSize, rowSize);
		layout.setVGap(2);
		layout.setHGap(5);
		Container container = frame.getContentPane();
		container.setLayout(layout);

		// Add controls
		layout.insertRow(1, p);
		container.add(labelConnect, "1, 1, 3, 1");
		layout.insertRow(2, p);
		container.add(textfieldConnect, "1, 2, 2, 2");
		container.add(buttonConfigure, "3, 2");
		layout.insertRow(3, emptySpace);
		layout.insertRow(4, p);
		container.add(labelUse, "1, 4, 3, 4");
		layout.insertRow(5, TableLayout.FILL);
		container.add(scrollPane, "1, 5, 3, 5");
		layout.insertRow(6, p);
		container.add(buttonInstall, "1, 6");
		container.add(buttonUninstall, "2, 6");
		container.add(buttonProperties, "3, 6");
		layout.insertRow(7, emptySpace);
		layout.insertRow(8, p);
		container.add(checkboxShowIcon, "1, 8, 3, 8");
		layout.insertRow(9, p);
		container.add(checkboxNotify, "1, 9, 3, 9");
		layout.insertRow(10, emptySpace);
		layout.insertRow(11, p);
		container.add(buttonOK, "2, 11");
		container.add(buttonCancel, "3, 11");

		// Show frame
		frame.pack();
		frame.setVisible(true);
		frame.toFront();
	}


}
|
Justifying with multiple cells
In the previous section we saw how to add a component to more than
one cell. By default all components are full justified. Components
that span cells can be justified in the same ways that components
that occupy a single cell can. In this section we will modify the
previous example to justify some of the button controls.
First we give the buttons an explicit preferred size that is
independent of their labels, so that they will all be the same size.
This is done by calling the setPreferredSize method
of JComponent. Second we place the OK and Cancel buttons in a
panel so that they can be laid out independently of the other
controls. The new panel will contain only two columns and will be
just large enough to house the two buttons.
The final change is to add horizontal and vertical justifications
to the components' constraints. This is done by changing the lines
like container.add(buttonInstall, "1, 6"); to
container.add(buttonInstall, "1, 6, LEFT, TOP");.
Similiarly, the button panel, which spans three columns, is added
with the line
container.add(panelButton, "1, 11, 3, 11, RIGHT, TOP");.
The justification flags are simply appended to the string constraint.
For those who wish to use type-safe code, the components could also
be added with the lines like
container.add(buttonInstall, new TableLayoutConstraints(1, 6, 1, 6, LEFT, TOP));.
In order to avoid ambiguity, the full cell range must be specified
when giving justifications. These changes are highlighted in blue
in the following listing.
When using left, center, right, top, bottom, leading, or trailing
justification, components will not be made larger than their
preferred size. However, they may be made smaller if the area
they occupy is not large enough to support their preferred sizes.
Finally, since vertical and horizontal justifications are
independent of each other, it is possible to stretch a component
in both directions, just one direction, or neither direction.
Similarly, a component can be placed in a corner, the center, or
an edge of a rectangular area.
Listing 2: Multicell Justification

package example2;


import java.awt.*;
import javax.swing.*;
import java.util.*;
import info.clearthought.layout.TableLayout;


/**
 * Example of components spanning cells and using justification.
 *
 * @author  Daniel E. Barbalace
 * @version 1.0, June 14, 2005
 */

public class MulticellJustify
{


	/**
	 * Runs the program.
	 */

	public static void main (String args[])
	{
		// Create frame
		JFrame frame = new JFrame("Local Area Connection - Primary Properties");
		frame.setDefaultCloseOperation(JFrame.EXIT_ON_CLOSE);
		frame.setLayout(new FlowLayout());

		// Items to display in list control
		Vector listElement = new Vector();
		listElement.add("Client for Microsoft Networks");
		listElement.add("File and Print Sharing for Microsoft Networks");
		listElement.add("QoS Packet Scheduler");
		listElement.add("Microsoft TCP/IP version 6");
		listElement.add("Internet Protocol (TCP/IP");

		// Create controls
		JLabel labelConnect = new JLabel("Connect using:");
		JTextField textfieldConnect = new JTextField("Intel(R) PRO/100 VE Network Connection");
		JButton buttonConfigure = new JButton("Configure...");
		JLabel labelUse = new JLabel("This connection uses the following items:");
		JList list = new JList(listElement);
		JScrollPane scrollPane = new JScrollPane(list);
		JButton buttonInstall = new JButton("Install");
		JButton buttonUninstall = new JButton("Uninstall");
		JButton buttonProperties = new JButton("Properties");
		JCheckBox checkboxShowIcon = new JCheckBox("Show icon in notification area when connected");
		JCheckBox checkboxNotify = new JCheckBox("Notify me when this connection has limited or no connectivity");
		JButton buttonOK = new JButton("OK");
		JButton buttonCancel = new JButton("Cancel");

		// Give buttons a definitive preferred size independent of their labels
		Dimension preferredSize = new Dimension(123, 26);
		buttonConfigure.setPreferredSize(preferredSize);
		buttonInstall.setPreferredSize(preferredSize);
		buttonUninstall.setPreferredSize(preferredSize);
		buttonProperties.setPreferredSize(preferredSize);
		buttonOK.setPreferredSize(preferredSize);
		buttonCancel.setPreferredSize(preferredSize);

		// Create and set layout
		double p = TableLayout.PREFERRED;
		double border = 10;
		double emptySpace = 10;
		double [] columnSize = {border, 1.0 / 3.0, TableLayout.FILL, 1.0 / 3.0, border};
		double [] rowSize = {border, border};
		TableLayout layout = new TableLayout(columnSize, rowSize);
		layout.setVGap(2);
		layout.setHGap(5);
		Container container = frame.getContentPane();
		container.setLayout(layout);

		// Place OK and cancel buttons in a panel so that they can be laid out
		// independently of all other controls
		JPanel panelButton = new JPanel();
		TableLayout layoutPanel = new TableLayout(new double [][] {{p, p}, {p}});
		layoutPanel.setHGap(5);
		panelButton.setLayout(layoutPanel);
		panelButton.add(buttonOK, "0, 0");
		panelButton.add(buttonCancel, "1, 0");

		// Add controls
		layout.insertRow(1, p);
		container.add(labelConnect, "1, 1, 3, 1");
		layout.insertRow(2, p);
		container.add(textfieldConnect, "1, 2, 2, 2");
		container.add(buttonConfigure, "3, 2");
		layout.insertRow(3, emptySpace);
		layout.insertRow(4, p);
		container.add(labelUse, "1, 4, 3, 4");
		layout.insertRow(5, TableLayout.FILL);
		container.add(scrollPane, "1, 5, 3, 5");
		layout.insertRow(6, p);
		container.add(buttonInstall, "1, 6, LEFT, TOP");
		container.add(buttonUninstall, "2, 6, CENTER, TOP");
		container.add(buttonProperties, "3, 6, RIGHT, TOP");
		layout.insertRow(7, emptySpace);
		layout.insertRow(8, p);
		container.add(checkboxShowIcon, "1, 8, 3, 8");
		layout.insertRow(9, p);
		container.add(checkboxNotify, "1, 9, 3, 9");
		layout.insertRow(10, emptySpace);
		layout.insertRow(11, p);
		container.add(panelButton, "1, 11, 3, 11, RIGHT, TOP");

		// Show frame
		frame.pack();
		frame.setVisible(true);
		frame.toFront();
	}


}
|
Borders
Without status bar
One of the most common patterns in layouts is the use of a border.
Although some containers use insets, these are typically used only
when the container paints its own border as in a group box. Often
the application developer wants to add an empty space around a
window to make the interface more asthetically pleasing. In this
example we show a simple border inside a window used to display
web pages. (Please note that since the example jar file is
unsigned, you will only be able to load pages from
dev.java.net when running the application from Java Web Start.)
The application will look like this.
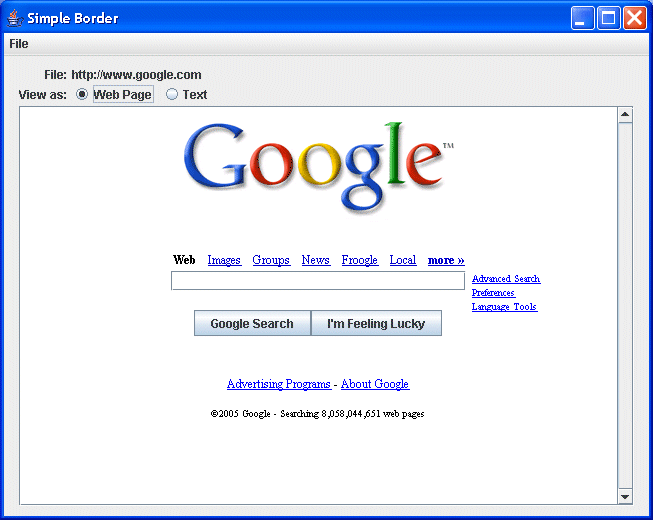
The border is created by specifying rows and columns in the layout
with the following code.
				double border = 10;
				double [] columnSize = {border, p, p, p, TableLayout.FILL, border};
				double [] rowSize = {border, p, p, TableLayout.FILL, border};
In this case a uniformed border of 10 pixels is created on
all four sides of the window. You can just as easily create a
border that varies from side to side just as one can in a word
processor.
Listing 3: Simple Border

package example2;


import java.awt.*;
import java.awt.event.*;
import java.io.*;
import java.net.*;
import javax.swing.*;
import info.clearthought.layout.*;


/**
 * BorderSimple demonstrates how to create a simple border.
 *
 * @author  Daniel E. Barbalace
 * @version 1.0, Jun 17, 2005
 */

public class BorderSimple implements ActionListener
{


	/** Main frame */
	private JFrame frame;

	/** Used to display the path of the file being displayed */
	private JLabel labelFilename;

	/** When selected, files will be displayed as web pages */
	private JRadioButton radioWebPage;

	/** When selected, files will be displayed as text */
	private JRadioButton radioText;

	/** Used to display HTML files as web pages */
	private JEditorPane paneWeb;

	/** Used to display HTML files as text */
	private JTextPane paneText;

	/** Used to scroll document view */
	private JScrollPane scrollPane;

	/** Open file menu item */
	private JMenuItem menuOpenFile;

	/** Open URL item */
	private JMenuItem menuOpenUrl;

	/** Exit menu item */
	private JMenuItem menuExit;


	/**
	 * Runs the program.
	 */

	public static void main (String args[])
	{
		new BorderSimple();
	}


	/**
	 * Creates the application's GUI.
	 */

	public BorderSimple()
	{
		// Create frame
		frame = new JFrame("Simple Border");
		frame.setDefaultCloseOperation(JFrame.EXIT_ON_CLOSE);

		// Create menu
		JMenuBar menuBar = new JMenuBar();
		JMenu menu = new JMenu("File");
		menuOpenFile = menu.add("Open File");
		menuOpenUrl = menu.add("Open URL");
		menuExit = menu.add("Exit");
		menuOpenFile.addActionListener(this);
		menuOpenUrl.addActionListener(this);
		menuExit.addActionListener(this);
		menuBar.add(menu);
		frame.setJMenuBar(menuBar);

		// Create controls
		JLabel labelFile = new JLabel("File:");
		labelFilename = new JLabel("");
		JLabel labelView = new JLabel("View as:");
		radioWebPage = new JRadioButton("Web Page");
		radioText = new JRadioButton("Text");
		ButtonGroup groupView = new ButtonGroup();
		groupView.add(radioWebPage);
		groupView.add(radioText);
		radioWebPage.setSelected(true);
		radioWebPage.addActionListener(this);
		radioText.addActionListener(this);
		paneWeb = new JEditorPane();
		paneWeb.setEditable(false);
		paneText = new JTextPane();
		paneText.setEditable(false);

		scrollPane = new JScrollPane(paneWeb);
		scrollPane.setVerticalScrollBarPolicy(JScrollPane.VERTICAL_SCROLLBAR_ALWAYS);
		scrollPane.setPreferredSize(new Dimension(600, 400));
		scrollPane.setMinimumSize(new Dimension(10, 10));

		// Create and set layout
		double p = TableLayout.PREFERRED;
		double border = 10;
		double [] columnSize = {border, p, p, p, TableLayout.FILL, border};
		double [] rowSize = {border, p, p, TableLayout.FILL, border};
		TableLayout layout = new TableLayout(columnSize, rowSize);
		layout.setHGap(5);
		Container container = frame.getContentPane();
		container.setLayout(layout);

		// Add controls
		container.add(labelFile,     "1, 1, RIGHT, BOTTOM");
		container.add(labelFilename, "2, 1, 4, 1");
		container.add(labelView,     "1, 2, RIGHT, CENTER");
		container.add(radioWebPage,  "2, 2");
		container.add(radioText,     "3, 2");
		container.add(scrollPane,    "1, 3, 4, 3");

		// Show one html file by default
		setPath("/sample.html");

		// Show frame
		frame.pack();
		frame.setVisible(true);
		frame.toFront();
	}


	/**
	 * Sets the path of the document to view.
	 *
	 * @param path	full or relative path of document
	 */

	private void setPath (String path)
	{
		// Attempt to open file in jar
		URL url = BorderSimple.class.getResource(path);

		// Attempt to open a full URL
		if (url == null)
		{
			try
			{
				url = new URL(path);
			}
			catch (MalformedURLException e) {}
		}

		// Attempt to open a local file
		if (url == null)
		{
			try
			{
				File file = new File(path);
				url = file.toURL();
			}
			catch (MalformedURLException e) {}
		}

		// If any of the attempts succeeded, open the url
		if (url != null)
		{
			try
			{
				paneWeb.setPage(url);
				paneText.setText(getContent(url));
				labelFilename.setText(path);
			}
			catch (IOException e)
			{
				paneWeb.setText("");
				paneText.setText("");
				labelFilename.setText("");
				System.err.println("Attempted to read a bad URL: " + url);
			}
		}
		else
		{
			System.err.println("Couldn't find file: " + path);
		}
	}


	/**
	 * Gets the contents of a URL as a string.
	 *
	 * @param url	document to get
	 *
	 * @return a string containing the URL's contents
	 */

	private String getContent (URL url)
	{
		StringBuffer content = new StringBuffer();

		try
		{
			String line = "";
			BufferedReader input = new BufferedReader(new InputStreamReader(url.openStream()));

			while (line != null)
			{
				content.append(line);

				if (line.length() > 0)
					content.append('\n');

				line = input.readLine();
			}

			input.close();
		}
		catch (MalformedURLException me) {}
		catch (IOException e) {}

		return content.toString();
	}


	/**
	 * Invoked when one of the radio buttons is selected.
	 */

	public void actionPerformed (ActionEvent e)
	{
		Object source = e.getSource();

		if (source == radioWebPage)
			scrollPane.setViewportView(paneWeb);
		else if (source == radioText)
			scrollPane.setViewportView(paneText);
		else if (source == menuOpenFile)
		{
			JFileChooser fc = new JFileChooser();
			int returnVal = fc.showOpenDialog(menuOpenFile);

			if (returnVal == JFileChooser.APPROVE_OPTION)
			{
				File file = fc.getSelectedFile();
   				setPath(file.getPath());
			}
		}
		else if (source == menuOpenUrl)
		{
			String message = "URL to open";
			String s = (String) JOptionPane.showInputDialog
				(frame, message, "Open URL", JOptionPane.PLAIN_MESSAGE, null, null, null);

			if ((s != null) && (s.length() > 0))
				setPath(s);
		}
		else if (source == menuExit)
			System.exit(0);
	}


}
|
With status bar
At this point you might wonder why TableLayout does not provide a
special method just for creating a border. If all borders were
exactly like the one above, it might make sense to have a
convenience method for creating them. However, TableLayout allows
you to create borders that are far more flexible.
In this example we change the previous application to use a status
bar. A status bar is not a standard part of a JFrame
like a window menu is. We cannot call a method like
JFrame.setJMenuBar to set a status bar. Instead we
will create a simple control to render a status bar. Since this
control is our own, the JFrame class will not allocate space for it
like JFrame does for the menu bar. Therefore, we must include some
space for it in our layout.
To make our application look more professional, we will also add
a heading, or banner, to the top of the window just below the window
menu. As with the status bar, we will allocate some space for the
heading in our layout. The end result will look like this.

The border is no longer along the edges of the window. The top and
bottom border have been moved inward so that they appear between the
heading and the status bar. The code changes trivially to
accomplish this.
double [] rowSize = {p, border, p, p, TableLayout.FILL, border, p};
The border constants are simply moved inward in the array.
Such flexibility could not be done through a setBorder
method. The changes to the code are highlighted in blue in the
following listing.
Listing 4: Border with Status Bar

package example2;


import java.awt.*;
import java.awt.event.*;
import java.io.*;
import java.net.*;
import javax.swing.*;
import info.clearthought.layout.*;


/**
 * BorderStatus expands the BorderSimple demonstration by adding a heading and
 * a status bar.
 *
 * @author  Daniel E. Barbalace
 * @version 1.0, Jun 17, 2005
 */

public class BorderStatus implements ActionListener
{


	/** Main frame */
	private JFrame frame;

	/** Used to display the path of the file being displayed */
	private JLabel labelFilename;

	/** When selected, files will be displayed as web pages */
	private JRadioButton radioWebPage;

	/** When selected, files will be displayed as text */
	private JRadioButton radioText;

	/** Used to display HTML files as web pages */
	private JEditorPane paneWeb;

	/** Used to display HTML files as text */
	private JTextPane paneText;

	/** Used to scroll document view */
	private JScrollPane scrollPane;

	/** Open file menu item */
	private JMenuItem menuOpenFile;

	/** Open URL item */
	private JMenuItem menuOpenUrl;

	/** Exit menu item */
	private JMenuItem menuExit;

	/** Status bar */
	private StatusBar statusBar;


	/**
	 * Runs the program.
	 */

	public static void main (String args[])
	{
		new BorderStatus();
	}


	/**
	 * Creates the application's GUI.
	 */

	public BorderStatus()
	{
		// Create frame
		frame = new JFrame("Border with a heading and a status bar");
		frame.setDefaultCloseOperation(JFrame.EXIT_ON_CLOSE);

		// Create menu
		JMenuBar menuBar = new JMenuBar();
		JMenu menu = new JMenu("File");
		menuOpenFile = menu.add("Open File");
		menuOpenUrl = menu.add("Open URL");
		menuExit = menu.add("Exit");
		menuOpenFile.addActionListener(this);
		menuOpenUrl.addActionListener(this);
		menuExit.addActionListener(this);
		menuBar.add(menu);
		frame.setJMenuBar(menuBar);

		// Create controls
		Heading heading = new Heading();
		JLabel labelFile = new JLabel("File:");
		labelFilename = new JLabel("");
		JLabel labelView = new JLabel("View as:");
		radioWebPage = new JRadioButton("Web Page");
		radioText = new JRadioButton("Text");
		ButtonGroup groupView = new ButtonGroup();
		groupView.add(radioWebPage);
		groupView.add(radioText);
		radioWebPage.setSelected(true);
		radioWebPage.addActionListener(this);
		radioText.addActionListener(this);
		paneWeb = new JEditorPane();
		paneWeb.setEditable(false);
		paneText = new JTextPane();
		paneText.setEditable(false);

		scrollPane = new JScrollPane(paneWeb);
		scrollPane.setVerticalScrollBarPolicy(JScrollPane.VERTICAL_SCROLLBAR_ALWAYS);
		scrollPane.setPreferredSize(new Dimension(600, 400));
		scrollPane.setMinimumSize(new Dimension(10, 10));

		statusBar = new StatusBar();

		// Create and set layout
		double p = TableLayout.PREFERRED;
		double border = 10;
		double [] columnSize = {border, p, p, p, TableLayout.FILL, border};
		double [] rowSize = {p, border, p, p, TableLayout.FILL, border, p};
		TableLayout layout = new TableLayout(columnSize, rowSize);
		layout.setHGap(5);
		Container container = frame.getContentPane();
		container.setLayout(layout);

		// Add controls
		container.add(heading,       "0, 0, 5, 0");
		container.add(labelFile,     "1, 2, RIGHT, BOTTOM");
		container.add(labelFilename, "2, 2, 4, 2");
		container.add(labelView,     "1, 3, RIGHT, CENTER");
		container.add(radioWebPage,  "2, 3");
		container.add(radioText,     "3, 3");
		container.add(scrollPane,    "1, 4, 4, 4");
		container.add(statusBar,     "0, 6, 5, 6");

		// Show one html file by default
		setPath("/sample.html");

		// Show frame
		frame.pack();
		frame.setVisible(true);
		frame.toFront();
	}


	/**
	 * Sets the path of the document to view.
	 *
	 * @param path	full or relative path of document
	 */

	private void setPath (String path)
	{
		// Attempt to open file in jar
		URL url = BorderStatus.class.getResource(path);

		// Attempt to open a full URL
		if (url == null)
		{
			try
			{
				url = new URL(path);
			}
			catch (MalformedURLException e) {}
		}

		// Attempt to open a local file
		if (url == null)
		{
			try
			{
				File file = new File(path);
				url = file.toURL();
			}
			catch (MalformedURLException e) {}
		}

		// If any of the attempts succeeded, open the url
		if (url != null)
		{
			try
			{
				paneWeb.setPage(url);
				paneText.setText(getContent(url));
				labelFilename.setText(path);
				statusBar.setText("Loaded " + url);
			}
			catch (IOException e)
			{
				paneWeb.setText("");
				paneText.setText("");
				labelFilename.setText("");
				statusBar.setText("Attempted to read a bad URL: " + url);
			}
		}
		else
		{
			statusBar.setText("Couldn't find file: " + path);
		}
	}


	/**
	 * Gets the contents of a URL as a string.
	 *
	 * @param url	document to get
	 *
	 * @return a string containing the URL's contents
	 */

	private String getContent (URL url)
	{
		StringBuffer content = new StringBuffer();

		try
		{
			String line = "";
			BufferedReader input = new BufferedReader(new InputStreamReader(url.openStream()));

			while (line != null)
			{
				content.append(line);

				if (line.length() > 0)
					content.append('\n');

				line = input.readLine();
			}

			input.close();
		}
		catch (MalformedURLException me) {}
		catch (IOException e) {}

		return content.toString();
	}


	/**
	 * Invoked when one of the radio buttons is selected.
	 */

	public void actionPerformed (ActionEvent e)
	{
		Object source = e.getSource();

		if (source == radioWebPage)
			scrollPane.setViewportView(paneWeb);
		else if (source == radioText)
			scrollPane.setViewportView(paneText);
		else if (source == menuOpenFile)
		{
			JFileChooser fc = new JFileChooser();
			int returnVal = fc.showOpenDialog(menuOpenFile);

			if (returnVal == JFileChooser.APPROVE_OPTION)
			{
				File file = fc.getSelectedFile();
   				setPath(file.getPath());
			}
		}
		else if (source == menuOpenUrl)
		{
			String message = "URL to open";
			String s = (String) JOptionPane.showInputDialog
				(frame, message, "Open URL", JOptionPane.PLAIN_MESSAGE, null, null, null);

			if ((s != null) && (s.length() > 0))
				setPath(s);
		}
		else if (source == menuExit)
			System.exit(0);
	}


	/**
	 * A simple graphic to display at the top of the GUI, just below the menu
	 * bar.
	 */

	private class Heading extends Component
	{
		public Dimension getPreferredSize()
		{
			FontMetrics fm = getFontMetrics(getFont());
			return new Dimension(400, fm.getHeight() * 3);
		}

		public void paint (Graphics g)
		{
			Dimension d = getSize();
			Graphics2D g2 = (Graphics2D) g;
			GradientPaint gradient = new GradientPaint
				(0, 0, new Color(26, 80, 184), d.width, 0, frame.getBackground(), true);
			g2.setPaint(gradient);
			g2.fill(new Rectangle(d.width, d.height));

			g2.setPaint(Color.white);
			int x = 0;
			int i = 0;
			String [] letter = {"J", "a", "v", "a"};

			while (x < d.width)
			{
				double offset = (d.height * Math.sin(2 * Math.PI * x / 100) / 4);
				g2.translate(x, offset);
				g2.drawString(letter[i++], 0, d.height / 2);
				g2.translate(-x, -offset);
				x += 10;

				if (i == letter.length)
					i = 0;
			}

			x = 0;
			while (x < d.width)
			{
				double offset = (d.height * -Math.sin(2 * Math.PI * x / 100) / 4);
				g2.translate(x, offset);
				g2.drawLine(0, d.height / 2, 0, d.height / 2);
				g2.translate(-x, -offset);
				x++;
			}
		}
	}


	/**
	 * A simple status bar.
	 */

	private class StatusBar extends Component
	{
		private String text = "";

		public StatusBar()
		{
			setForeground(Color.BLACK);
			setBackground(Color.LIGHT_GRAY);
		}

		public void setText (String text)
		{
			if (text != null)
			{
				this.text = text;
				repaint();
			}
		}

		public String getText()
		{
			return text;
		}

		public Dimension getPreferredSize()
		{
			FontMetrics fm = getFontMetrics(getFont());
			int width = fm.stringWidth(text) + 4;
			int height = fm.getMaxAscent() + fm.getMaxDescent() + 2;
			return new Dimension(width, height);
		}

		public void paint (Graphics g)
		{
			FontMetrics fm = getFontMetrics(getFont());
			Dimension d = getSize();
			int baseline = d.height - fm.getMaxDescent() - 1;

			g.setColor(getBackground());
			g.fillRect(0, 0, d.width, d.height);
			g.setColor(getForeground());
			g.drawString(text, 2, baseline);

			g.setColor(Color.black);
			g.drawRect(0, 0, d.width - 1, d.height - 1);
		}
	}


}
|
With left menu
In this final example of borders we enhance the application to make
it even more professional looking by adding a left navigation menu.
Such a layout is common in web applications, but also can prove
useful in desktop applications. The left menu is implemented as a
JTree that lies to the left of the border. To make the
application look stylish, we change the background colors of the
JTree to match the heading. The heading is also adjusted so that
its fading occurs only to the right of the JTree. The result is
shown below.
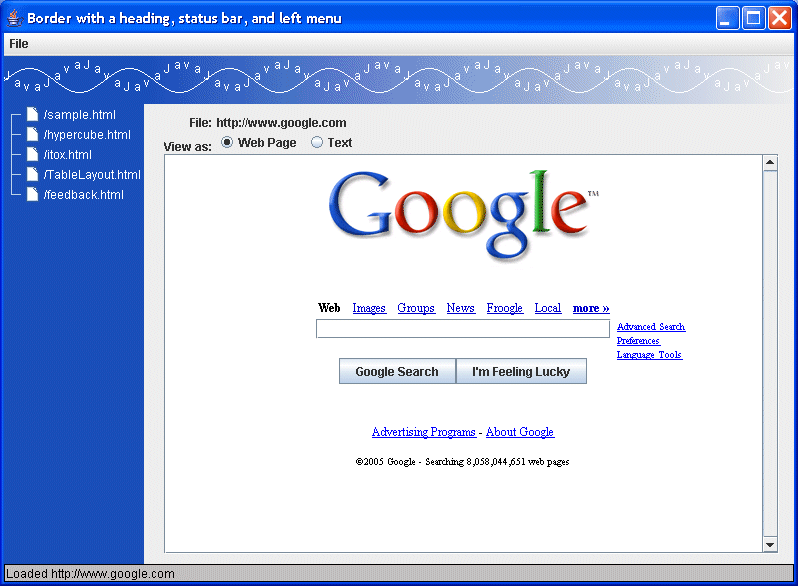
One of the great things about TableLayout is that layouts like the
one above can be easily achieved without nesting containers. In
this example all controls are added to a single container, the
content pane of the application's JFrame. The blue and gray
background effects are rendered using the background colors of
components placed directly in the content pane. The changes needed
to make the left navigation menu are listed in blue below.
Listing 5: Border with Left Menu

package example2;


import java.awt.*;
import java.awt.event.*;
import java.io.*;
import java.net.*;
import java.util.*;
import javax.swing.*;
import javax.swing.event.*;
import javax.swing.tree.*;
import info.clearthought.layout.*;


/**
 * BorderLeftMenu extends the BorderStatus demonstration by adding a left
 * navigation menu.
 *
 * @author  Daniel E. Barbalace
 * @version 1.0, Jun 17, 2005
 */

public class BorderLeftMenu implements ActionListener, TreeSelectionListener
{


	/** Main frame */
	private JFrame frame;

	/** Used to display the path of the file being displayed */
	private JLabel labelFilename;

	/** When selected, files will be displayed as web pages */
	private JRadioButton radioWebPage;

	/** When selected, files will be displayed as text */
	private JRadioButton radioText;

	/** Used to display HTML files as web pages */
	private JEditorPane paneWeb;

	/** Used to display HTML files as text */
	private JTextPane paneText;

	/** Used to scroll document view */
	private JScrollPane scrollPane;

	/** Open file menu item */
	private JMenuItem menuOpenFile;

	/** Open URL item */
	private JMenuItem menuOpenUrl;

	/** Exit menu item */
	private JMenuItem menuExit;

	/** Status bar */
	private StatusBar statusBar;

	/** Left navigation menu */
	private JTree leftMenu;


	/**
	 * Runs the program.
	 */

	public static void main (String args[])
	{
		new BorderLeftMenu();
	}


	/**
	 * Creates the application's GUI.
	 */

	public BorderLeftMenu()
	{
		// Create frame
		frame = new JFrame("Border with a heading, status bar, and left menu");
		frame.setDefaultCloseOperation(JFrame.EXIT_ON_CLOSE);

		// Create menu
		JMenuBar menuBar = new JMenuBar();
		JMenu menu = new JMenu("File");
		menuOpenFile = menu.add("Open File");
		menuOpenUrl = menu.add("Open URL");
		menuExit = menu.add("Exit");
		menuOpenFile.addActionListener(this);
		menuOpenUrl.addActionListener(this);
		menuExit.addActionListener(this);
		menuBar.add(menu);
		frame.setJMenuBar(menuBar);

		// Create controls
		Heading heading = new Heading();
		JLabel labelFile = new JLabel("File:");
		labelFilename = new JLabel("");
		JLabel labelView = new JLabel("View as:");
		radioWebPage = new JRadioButton("Web Page");
		radioText = new JRadioButton("Text");
		ButtonGroup groupView = new ButtonGroup();
		groupView.add(radioWebPage);
		groupView.add(radioText);
		radioWebPage.setSelected(true);
		radioWebPage.addActionListener(this);
		radioText.addActionListener(this);
		paneWeb = new JEditorPane();
		paneWeb.setEditable(false);
		paneText = new JTextPane();
		paneText.setEditable(false);

		scrollPane = new JScrollPane(paneWeb);
		scrollPane.setVerticalScrollBarPolicy(JScrollPane.VERTICAL_SCROLLBAR_ALWAYS);
		scrollPane.setPreferredSize(new Dimension(600, 400));
		scrollPane.setMinimumSize(new Dimension(10, 10));

		statusBar = new StatusBar();

		Vector v = new Vector();
		v.add("/sample.html");
		v.add("/hypercube.html");
		v.add("/itox.html");
		v.add("/TableLayout.html");
		v.add("/feedback.html");
		leftMenu = new JTree(v);
		leftMenu.addTreeSelectionListener(this);

		Color backgroundColor = new Color(26, 80, 184);
		DefaultTreeCellRenderer renderer = new DefaultTreeCellRenderer();
		renderer.setTextNonSelectionColor(Color.WHITE);
		renderer.setBackground(backgroundColor);
		renderer.setBackgroundNonSelectionColor(backgroundColor);
		leftMenu.setCellRenderer(renderer);
		leftMenu.setBackground(backgroundColor);

		// Create and set layout
		double p = TableLayout.PREFERRED;
		double border = 10;
		double [] columnSize =
			{p, border, border, p, p, p, TableLayout.FILL, border};
		double [] rowSize = {p, border, p, p, TableLayout.FILL, border, p};
		TableLayout layout = new TableLayout(columnSize, rowSize);
		layout.setHGap(5);
		Container container = frame.getContentPane();
		container.setLayout(layout);

		// Add controls
		container.add(heading,       "0, 0, 7, 0");
		container.add(labelFile,     "3, 2, RIGHT, BOTTOM");
		container.add(labelFilename, "4, 2, 6, 2");
		container.add(labelView,     "3, 3, RIGHT, BOTTOM");
		container.add(radioWebPage,  "4, 3");
		container.add(radioText,     "5, 3");
		container.add(scrollPane,    "3, 4, 6, 4");
		container.add(statusBar,     "0, 6, 7, 6");
		container.add(leftMenu,      "0, 1, 0, 5");

		// Show one html file by default
		setPath("/sample.html");

		// Show frame
		frame.pack();
		frame.setVisible(true);
		frame.toFront();
	}


	/**
	 * Sets the path of the document to view.
	 *
	 * @param path	full or relative path of document
	 */

	private void setPath (String path)
	{
		// Attempt to open file in jar
		URL url = BorderLeftMenu.class.getResource(path);

		// Attempt to open a full URL
		if (url == null)
		{
			try
			{
				url = new URL(path);
			}
			catch (MalformedURLException e) {}
		}

		// Attempt to open a local file
		if (url == null)
		{
			try
			{
				File file = new File(path);
				url = file.toURL();
			}
			catch (MalformedURLException e) {}
		}

		// If any of the attempts succeeded, open the url
		if (url != null)
		{
			try
			{
				paneWeb.setPage(url);
				paneText.setText(getContent(url));
				labelFilename.setText(path);
				statusBar.setText("Loaded " + url);
			}
			catch (IOException e)
			{
				paneWeb.setText("");
				paneText.setText("");
				labelFilename.setText("");
				statusBar.setText("Attempted to read a bad URL: " + url);
			}
		}
		else
		{
			statusBar.setText("Couldn't find file: " + path);
		}
	}


	/**
	 * Gets the contents of a URL as a string.
	 *
	 * @param url	document to get
	 *
	 * @return a string containing the URL's contents
	 */

	private String getContent (URL url)
	{
		StringBuffer content = new StringBuffer();

		try
		{
			String line = "";
			BufferedReader input = new BufferedReader(new InputStreamReader(url.openStream()));

			while (line != null)
			{
				content.append(line);

				if (line.length() > 0)
					content.append('\n');

				line = input.readLine();
			}

			input.close();
		}
		catch (MalformedURLException me) {}
		catch (IOException e) {}

		return content.toString();
	}


	/**
	 * Invoked when one of the radio buttons is selected.
	 */

	public void actionPerformed (ActionEvent e)
	{
		Object source = e.getSource();

		if (source == radioWebPage)
			scrollPane.setViewportView(paneWeb);
		else if (source == radioText)
			scrollPane.setViewportView(paneText);
		else if (source == menuOpenFile)
		{
			JFileChooser fc = new JFileChooser();
			int returnVal = fc.showOpenDialog(menuOpenFile);

			if (returnVal == JFileChooser.APPROVE_OPTION)
			{
				File file = fc.getSelectedFile();
				   setPath(file.getPath());
			}
		}
		else if (source == menuOpenUrl)
		{
			String message = "URL to open";
			String s = (String) JOptionPane.showInputDialog
				(frame, message, "Open URL", JOptionPane.PLAIN_MESSAGE, null, null, null);

			if ((s != null) && (s.length() > 0))
				setPath(s);
		}
		else if (source == menuExit)
			System.exit(0);
	}


	/**
	  * Invoked when the value of the left menu changes.
	  */

	public void valueChanged (TreeSelectionEvent e)
	{
		TreePath path = e.getNewLeadSelectionPath();
		Object [] array = path.getPath();
		String item = (array.length == 2) ? "" + array[1] : "";

		if (item.length() > 0)
			setPath(item);
	}


	/**
	 * A simple graphic to display at the top of the GUI, just below the menu
	 * bar.
	 */

	private class Heading extends Component
	{
		public Dimension getPreferredSize()
		{
			FontMetrics fm = getFontMetrics(getFont());
			return new Dimension(400, fm.getHeight() * 3);
		}

		public void paint (Graphics g)
		{
			Dimension d = getSize();
			Graphics2D g2 = (Graphics2D) g;
			GradientPaint gradient = new GradientPaint
				(leftMenu.getSize().width, 0, new Color(26, 80, 184),
				 d.width, 0, frame.getBackground(), false);
			g2.setPaint(gradient);
			g2.fill(new Rectangle(d.width, d.height));

			g2.setPaint(Color.white);
			int x = 0;
			int i = 0;
			String [] letter = {"J", "a", "v", "a"};

			while (x < d.width)
			{
				double offset = (d.height * Math.sin(2 * Math.PI * x / 100) / 4);
				g2.translate(x, offset);
				g2.drawString(letter[i++], 0, d.height / 2);
				g2.translate(-x, -offset);

				x += 10;

				if (i == letter.length)
					i = 0;
			}

			x = 0;
			while (x < d.width)
			{
				double offset = (d.height * -Math.sin(2 * Math.PI * x / 100) / 4);
				g2.translate(x, offset);
				g2.drawLine(0, d.height / 2, 0, d.height / 2);
				g2.translate(-x, -offset);
				x++;
			}
		}
	}


	/**
	 * A simple status bar.
	 */

	private class StatusBar extends Component
	{
		private String text = "";

		public StatusBar()
		{
			setForeground(Color.BLACK);
			setBackground(Color.LIGHT_GRAY);
		}

		public void setText (String text)
		{
			if (text != null)
			{
				this.text = text;
				repaint();
			}
		}

		public String getText()
		{
			return text;
		}

		public Dimension getPreferredSize()
		{
			FontMetrics fm = getFontMetrics(getFont());
			int width = fm.stringWidth(text) + 4;
			int height = fm.getMaxAscent() + fm.getMaxDescent() + 2;
			return new Dimension(width, height);
		}

		public void paint (Graphics g)
		{
			FontMetrics fm = getFontMetrics(getFont());
			Dimension d = getSize();
			int baseline = d.height - fm.getMaxDescent() - 1;

			g.setColor(getBackground());
			g.fillRect(0, 0, d.width, d.height);
			g.setColor(getForeground());
			g.drawString(text, 2, baseline);

			g.setColor(Color.black);
			g.drawRect(0, 0, d.width - 1, d.height - 1);
		}
	}


}
|
Toggle Visibility
Toggle a single row
A simple yet powerful UI technique used in web applications is to
toggle the visibility of controls in a form based on the decisions
made earlier in the form. This technique is not often used in
desktop applications because of the difficulty of making such
changes in most layout managers. TableLayout provides an easy
means of turning off rows or columns.
Let us go back to the first example given in this article, a
network connection property window. There was a checkbox for
notifying the user when the Internet connection goes down. Let's
add a text field for specifying a timeout that must occur before
the notification is sent. We will also put a label next to the
text field. The result will look like this.
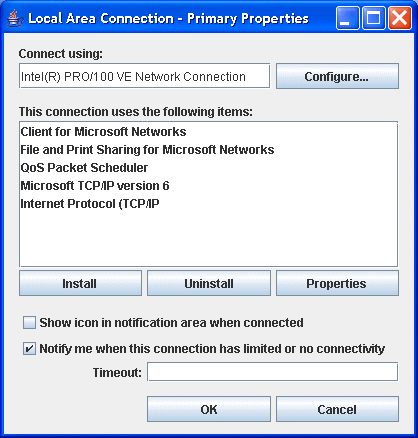
When the checkbox is checked the row containing the new label and
textfield is visible because its height is set to
TableLayout.PREFFERED. We can effectively remove this row by
setting its height to zero when the checkbox is unchecked. This
is accomplished with one line of code.
layout.setRow(10, checkboxNotify.isSelected() ? TableLayout.PREFERRED : 0);
However, in order to see this change we need two additional lines of
code.
			container.invalidate();
			container.validate();
The first line tells the AWT framework that the container's layout
is now invalid and that it should be laid out again. The second
line tells the AWT framework to lay out the container if necessary.
These two tasks are seperated for performance reasons. Many things
may cause a container to be invalidate. A single call to
validate can take care of the container after mutliple
calls to invalidate. This is one of the reasons why
TableLayout does not automatically redo the layout of a container
when setRow is called. The other reason is that a
single instance of TableLayout or any layout manager could be used
for multiple containers.
Note that you should never call Container.doLayout()
to accomplish this task. doLayout should never be
called directly by you application. The AWT framework calls this
method and the precise effects of this call are subject to change
between releases of Java.
Notice that when the row is toggled the size of the list box is
adjusted automatically to fill in the remaining space or to give
up adaquate space for the toggled row. This happens because the
row occupied by the list box has a height of TableLayout.FILL, so
it automatically fills the remaining space.
If you want to toggle the visibility of form elements without
changing the size or positions or other controls, then you should
call the setVisible method of the controls rather than
resize rows or columns.
Listing 6: Toggle a Row

package example2;


import java.awt.*;
import java.awt.event.*;
import javax.swing.*;
import java.util.*;
import info.clearthought.layout.TableLayout;


/**
 * Example of components spanning cells.
 *
 * @author  Daniel E. Barbalace
 * @version 1.0, June 14, 2005
 */

public class Toggle1 implements ActionListener
{


	/** Instance of TableLayout we are using */
	private static TableLayout layout;

	/** Checkbox that indicates whether or not to notify the user when the
	    Internet connection goes down. */
	private static JCheckBox checkboxNotify;

	/** Container using the layout */
	private static Container container;


	/**
	 * Runs the program.
	 */

	public static void main (String args[])
	{
		// Create frame
		JFrame frame = new JFrame("Local Area Connection - Primary Properties");
		frame.setDefaultCloseOperation(JFrame.EXIT_ON_CLOSE);

		// Items to display in list control
		Vector listElement = new Vector();
		listElement.add("Client for Microsoft Networks");
		listElement.add("File and Print Sharing for Microsoft Networks");
		listElement.add("QoS Packet Scheduler");
		listElement.add("Microsoft TCP/IP version 6");
		listElement.add("Internet Protocol (TCP/IP");

		// Create controls
		JLabel labelConnect = new JLabel("Connect using:");
		JTextField textfieldConnect = new JTextField("Intel(R) PRO/100 VE Network Connection");
		JButton buttonConfigure = new JButton("Configure...");
		JLabel labelUse = new JLabel("This connection uses the following items:");
		JList list = new JList(listElement);
		JScrollPane scrollPane = new JScrollPane(list);
		JButton buttonInstall = new JButton("Install");
		JButton buttonUninstall = new JButton("Uninstall");
		JButton buttonProperties = new JButton("Properties");
		JCheckBox checkboxShowIcon = new JCheckBox("Show icon in notification area when connected");
		checkboxNotify = new JCheckBox("Notify me when this connection has limited or no connectivity");
		checkboxNotify.addActionListener(new Toggle1());
		JLabel labelTimeout = new JLabel("Timeout:");
		JTextField textfieldTimeout = new JTextField();
		JButton buttonOK = new JButton("OK");
		JButton buttonCancel = new JButton("Cancel");

		// Create and set layout
		double p = TableLayout.PREFERRED;
		double border = 10;
		double emptySpace = 10;
		double [] columnSize = {border, 1.0 / 3.0, TableLayout.FILL, 1.0 / 3.0, border};
		double [] rowSize = {border, border};
		layout = new TableLayout(columnSize, rowSize);
		layout.setVGap(2);
		layout.setHGap(5);
		container = frame.getContentPane();
		container.setLayout(layout);

		// Add controls
		layout.insertRow(1, p);
		container.add(labelConnect, "1, 1, 3, 1");
		layout.insertRow(2, p);
		container.add(textfieldConnect, "1, 2, 2, 2");
		container.add(buttonConfigure, "3, 2");
		layout.insertRow(3, emptySpace);
		layout.insertRow(4, p);
		container.add(labelUse, "1, 4, 3, 4");
		layout.insertRow(5, TableLayout.FILL);
		container.add(scrollPane, "1, 5, 3, 5");
		layout.insertRow(6, p);
		container.add(buttonInstall, "1, 6");
		container.add(buttonUninstall, "2, 6");
		container.add(buttonProperties, "3, 6");
		layout.insertRow(7, emptySpace);
		layout.insertRow(8, p);
		container.add(checkboxShowIcon, "1, 8, 3, 8");
		layout.insertRow(9, p);
		container.add(checkboxNotify, "1, 9, 3, 9");
		layout.insertRow(10, p);
		container.add(labelTimeout, "1, 10, RIGHT, CENTER");
		container.add(textfieldTimeout, "2, 10, 3, 10");
		layout.insertRow(11, emptySpace);
		layout.insertRow(12, p);
		container.add(buttonOK, "2, 12");
		container.add(buttonCancel, "3, 12");

		// Note: We don't want to show the timeout row initially because the
		// checkbox will not be checked.  However, we want to include the
		// timeout row's height in the calculation done by Frame.pack().
		// So we call updateDynamicRows() after pack() has been called.

		// Show frame
		frame.pack();
		updateDynamicRows();
		frame.setVisible(true);
		frame.toFront();
	}


	/**
	 * Invoked when the checkbox is toggled.
	 */

	public void actionPerformed (ActionEvent e)
	{
		updateDynamicRows();
	}


	/**
	 * Updates the visibility of dynamic rows.
	 */

	private static void updateDynamicRows()
	{
		layout.setRow(10, checkboxNotify.isSelected() ? TableLayout.PREFERRED : 0);
		container.invalidate();
		container.validate();
	}


}
|
Switching between groups of rows
Multiple rows or columns can be toggled just as easily and a single
row. One could argue that the timeout control in the previous
example should just be disabled rather than effectively removed.
However, the benefits of toggle rows and columns becomes more
apparent when an application switches between two sets of controls
based upon the values specified in radio buttons or drop-down menus.
In this example we toggle several sets of rows based on the item
selected in a JComboBox. There is some overlap in the
sets of rows. The three possible views of the application are shown
below.
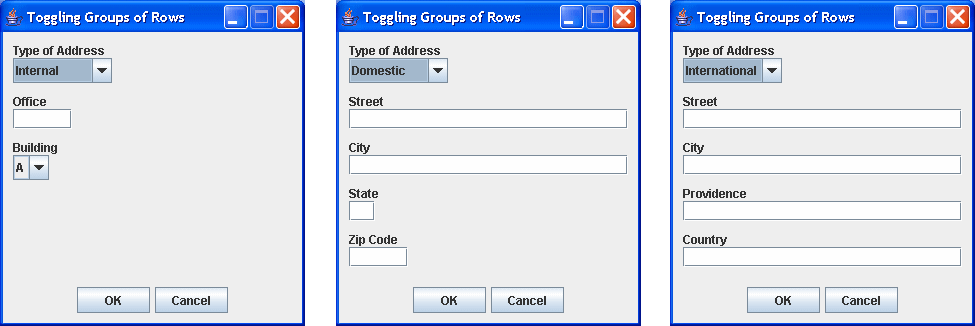
When an address type is selected all the dyanmic rows are zero'd out
in a loop.
        for (int y = rowStart; y <= rowStop + 1; y++)
            layout.setRow(y, 0);
Then a selected range of rows is given non-zero sizes. Rows not
containing form elements (every third row) are given a fixed size
for spacing. The others are given their preferred size.
        for (int y = rowStart; y <= rowStop + 1; y++)
        {
            double size = ((y - rowStart) % 3 == 2) ? EMPTY_SPACE : TableLayout.PREFERRED;
            layout.setRow(y, size);
        }
Finally, invalidate and validate are
called once. Only then does TableLayout spend CPU cycles
calculating the layout. The result is an instaneous update of
the window with the correct rows showing.
This example also shows how the TableLayout API can be used to
create dynamic layouts without hard-coding cell coordinates. Rows
are added on the fly and row numbers are calculated at run-time.
The TableConstraints class is used to place a row
immediately before the OK and Cancel buttons and to center these
buttons in the window as shown below.
        TableLayoutConstraints tlc = layout.getConstraints(panelButton);
        tlc.hAlign = TableLayout.CENTER;
        layout.setConstraints(panelButton, tlc);

        layout.insertRow(tlc.row1, TableLayout.FILL);
Listing 7: Switching Rows

package example2;


import java.awt.*;
import java.awt.event.*;

import javax.imageio.ImageIO;
import javax.swing.*;
import java.util.*;
import info.clearthought.layout.TableLayout;
import info.clearthought.layout.TableLayoutConstraints;


/**
 * Example of components spanning cells.
 *
 * @author  Daniel E. Barbalace
 * @version 1.0, June 20, 2005
 */

public class Toggle2 implements ActionListener
{


	/** Indicates an internal office address */
	private static final String INTERNAL = "Internal";

	/** Indicates a domestic (US) address */
	private static final String DOMESTIC = "Domestic";

	/** Indicates an international (non-US) address */
	private static final String INTERNATIONAL = "International";

	/** Empty space for asthetics */
	private static double EMPTY_SPACE = 10;

	/** Instance of TableLayout we are using */
	private TableLayout layout;

	/** Container using the layout */
	private Container container;

	/** Identifies the type of address */
	private JComboBox comboType;

	// A whole bunch of controls that this application will use.
	JLabel labelOffice = new JLabel("Office");
	JTextField textOffice = new JTextField(5);
	JLabel labelBuilding = new JLabel("Building");
	JComboBox comboBuilding = new JComboBox(new String [] {"A", "B", "C"});
	JLabel labelStreet = new JLabel("Street");
	JLabel labelCity = new JLabel("City");
	JLabel labelState = new JLabel("State");
	JLabel labelZip = new JLabel("Zip Code");
	JLabel labelProvidence = new JLabel("Providence");
	JLabel labelCountry = new JLabel("Country");
	JTextField textStreet = new JTextField(25);
	JTextField textCity = new JTextField(25);
	JTextField textState = new JTextField(2);
	JTextField textZip = new JTextField(5);
	JTextField textProvidence = new JTextField(25);
	JTextField textCountry = new JTextField(25);


	/**
	 * Runs the program.
	 */

	public static void main (String args[])
	{
		new Toggle2();
	}


	public Toggle2()
	{
		// Create frame
		JFrame frame = new JFrame("Toggling Groups of Rows");
		frame.setDefaultCloseOperation(JFrame.EXIT_ON_CLOSE);
		frame.setResizable(false);

		// Create and set layout
		double p = TableLayout.PREFERRED;
		double f = TableLayout.FILL;
		double border = 10;
		double [] columnSize = {border, f, border};
		double [] rowSize = {border, border};
		layout = new TableLayout(columnSize, rowSize);
		container = frame.getContentPane();
		container.setLayout(layout);

		// Create controls
		JLabel labelType = new JLabel("Type of Address");
		comboType = new JComboBox(new String []
			{INTERNAL, DOMESTIC, INTERNATIONAL});
		comboType.setEditable(false);
		comboType.addActionListener(this);
		comboBuilding.setEditable(false);
		JButton buttonOK = new JButton("OK");
		JButton buttonCancel = new JButton("Cancel");
		JPanel panelButton = new JPanel();
		double p2 = buttonCancel.getPreferredSize().width;
		panelButton.setLayout(new TableLayout(new double [][] {{p2, 5, p2}, {p}}));
		panelButton.add(buttonOK, "0, 0");
		panelButton.add(buttonCancel, "2, 0");

		// Add controls
		addControl(labelType);
		addControl(comboType);
		addSpace();
		addControl(labelOffice);
		addControl(textOffice);
		addSpace();
		addControl(labelBuilding);
		addControl(comboBuilding);
		addSpace();
		addControl(labelStreet);
		addControl(textStreet);
		addSpace();
		addControl(labelCity);
		addControl(textCity);
		addSpace();
		addControl(labelState);
		addControl(textState);
		addSpace();
		addControl(labelZip);
		addControl(textZip);
		addSpace();
		addControl(labelProvidence);
		addControl(textProvidence);
		addSpace();
		addControl(labelCountry);
		addControl(textCountry);
		addSpace();

		// Add the button panel and then center justify it
		addControl(panelButton);
		TableLayoutConstraints tlc = layout.getConstraints(panelButton);
		tlc.hAlign = TableLayout.CENTER;
		layout.setConstraints(panelButton, tlc);

		// Add a filler row above the button panel so that the button panel
		// will stay at the bottom of the window
		layout.insertRow(tlc.row1, TableLayout.FILL);

		// Calculate the maximum size the frame would use
		int numItem = comboType.getItemCount();
		Dimension max = new Dimension(0, 0);
		frame.setVisible(true);

		for (int i = 0; i < numItem; i++)
		{
			comboType.setSelectedIndex(i);
			updateDynamicRows();
			Dimension d = frame.getPreferredSize();
			max.width = Math.max(max.width, d.width);
			max.height = Math.max(max.height, d.height);
		}

		comboType.setSelectedIndex(0);
		updateDynamicRows();

		// Show frame
		frame.setSize(max.width, max.height);
		frame.toFront();
	}


	/**
	 * Adds a row and a control to the content pane.
	 */

	private void addControl (Component component)
	{
		int rowNum = layout.getNumRow() - 1;
		layout.insertRow(rowNum, TableLayout.PREFERRED);
		container.add(component, new TableLayoutConstraints
			(1, rowNum, 1, rowNum, TableLayout.LEFT, TableLayout.BOTTOM));
	}


	/**
	 * Adds a blank row so that the window looks nice.
	 */

	private void addSpace()
	{
		int rowNum = layout.getNumRow() - 1;
		layout.insertRow(rowNum, EMPTY_SPACE);
	}


	/**
	 * Invoked when the checkbox is toggled.
	 */

	public void actionPerformed (ActionEvent e)
	{
		updateDynamicRows();
	}


	/**
	 * Updates the visibility of dynamic rows.  This method first zero outs all
	 * dynamic rows.  Then it resizes the relavent rows to
	 * TableLayout.PREFERRED, thereby making their contents visible.  Some
	 * rows, like the ones pertaining to the city, are visible for more than
	 * one type of address.
	 */

	private void updateDynamicRows()
	{
		String type = "" + comboType.getSelectedItem();
		int rowMin, rowMax, rowStart = -1, rowStop = -1;
		rowMin = getRow(labelOffice);
		rowMax = getRow(textCountry);

		if (type.equals(INTERNAL))
		{
			rowStart = getRow(labelOffice);
			rowStop = getRow(comboBuilding);
		}
		else if (type.equals(DOMESTIC))
		{
			rowStart = getRow(labelStreet);
			rowStop = getRow(textZip);
		}
		else if (type.equals(INTERNATIONAL))
		{
			rowStart = getRow(labelProvidence);
			rowStop = getRow(textCountry);
		}

		if (rowMin >= 0 && rowMax >= 0)
			for (int y = rowMin; y <= rowMax; y++)
				layout.setRow(y, 0);

		if (rowStart >= 0 && rowStop >= 0)
			for (int y = rowStart; y <= rowStop + 1; y++)
			{
				double size = ((y - rowStart) % 3 == 2) ?
					EMPTY_SPACE : TableLayout.PREFERRED;
				layout.setRow(y, size);
			}

		if (type.equals(INTERNATIONAL))
		{
			rowStart = getRow(labelStreet);
			rowStop = getRow(textCity);

			if (rowStart >= 0 && rowStop >= 0)
				for (int y = rowStart; y <= rowStop + 1; y++)
				{
					double size = ((y - rowStart) % 3 == 2) ?
						EMPTY_SPACE : TableLayout.PREFERRED;
					layout.setRow(y, size);
				}
		}

		container.invalidate();
		container.validate();
	}


	/**
	 * Gets the row associated with a control.
	 *
	 * @return the row in which a control has been placed or -1 if the component
	 *		 is not found
	 */

	private int getRow (Component component)
	{
		TableLayoutConstraints tlc = layout.getConstraints(component);
		return (tlc == null) ? -1 : tlc.row1;
	}


}
|
Scrolling
A simple example of a scrolling effect
TableLayout enables the developer to do things that are unimaginable
with other layout managers. One such thing is adding scrolling
effects to your GUI. In this example we see how a component can
be scrolled into existence or bounced from side to side.
A row or column can be scrolled into existence by starting with a
zero size and steadily increasing the size until it reaches the
desired size. This can be done by using the setRow
and setColumn methods. The following code snippet
shows a row at the top of a container being continuously scrolled
into and out of existence.
        double size = 0;
        double delta = 1;

        while (true)
        {
            size += delta;
            layout.setRow(0, size);
            container.invalidate();
            container.validate();

            if (size == 0)
                delta = 1;
            else if (size == 50)
                delta = -1;

            try {Thread.sleep(DELAY);} catch (InterruptedException e) {}
        }
Side to side scrolling can also be accomplished by adjusting the
sizes of empty columns to the immediate left or right of a column
containing a component. The next code snippet illustrates this.
        int counter = 0;

        while (true)
        {
    	    int offset = BOUNCE_SPACE_2 + (int)
    	        (BOUNCE_SPACE_2 * Math.sin(0.01 * Math.PI * counter++));

            layout.setColumn(0, offset);
            layout.setColumn(2, BOUNCE_SPACE - offset);
            container.invalidate();
            container.validate();

            try {Thread.sleep(DELAY);} catch (InterruptedException e) {}
        }
Listing 8: Simple Scrolling Example

package example2;


import java.awt.*;
import javax.swing.*;
import info.clearthought.layout.TableLayout;


/**
 * Example of components spanning cells.
 *
 * @author  Daniel E. Barbalace
 * @version 1.0, June 21, 2005
 */

public class Scrolling1 implements Runnable
{


    /** Delay between updates in milliseconds */
    private static final int DELAY = 1000 / 60;

    /** Space devoted to left/right bouncing */
    private static final int BOUNCE_SPACE = 200;

    /** Half of the above space */
    private static final int BOUNCE_SPACE_2 = BOUNCE_SPACE / 2;

    /** Instance of TableLayout we are using */
    private TableLayout layout;

    /** Container being laid out */
    private Container container;

    /** Thread used to scroll top button */
    private Thread threadTop;

    /** Thread used to scroll bottom buttom */
    private Thread threadBottom;


    /**
     * Runs the program.
     */

    public static void main (String args[])
    {
        new Scrolling1();
    }


    /**
     * Creates the app.
     */

    public Scrolling1()
    {
        // Create frame
        JFrame frame = new JFrame("Example of scrolling components");
        frame.setDefaultCloseOperation(JFrame.EXIT_ON_CLOSE);
        frame.setResizable(false);

        // Create controls
        JButton buttonTop = new JButton("Scrolling");
        JButton buttonBottom = new JButton("By your command");

        // Create and set layout
        double f = TableLayout.FILL;
        double p = TableLayout.PREFERRED;
        double [] columnSize = {0, p, BOUNCE_SPACE};
        double [] rowSize = {0, f, p};
        layout = new TableLayout(columnSize, rowSize);
        container = frame.getContentPane();
        container.setLayout(layout);

        // Add controls
        container.add(buttonTop, "0, 0, 2, 0");
        container.add(buttonBottom, "1, 2");

        // Show frame
        Dimension d = frame.getPreferredSize();
        frame.setSize(d.width, 200);
        frame.setVisible(true);
        frame.toFront();

        // Start the scrolling effects
        threadTop = new Thread(this);
        threadBottom = new Thread(this);
        threadTop.start();
        threadBottom.start();
    }


    /**
     * Routes threads.
     */

    public void run()
    {
        Thread thread = Thread.currentThread();

        if (thread == threadTop)
            runTop();
        else if (thread == threadBottom)
            runBottom();
    }


    /**
     * Scrolls the top button into and out of existence.
     */

    private void runTop()
    {
        double size = 0;
        double delta = 1;

        while (true)
        {
            size += delta;
            layout.setRow(0, size);
            container.invalidate();
            container.validate();

            if (size == 0)
                delta = 1;
            else if (size == 50)
                delta = -1;

            try {Thread.sleep(DELAY);} catch (InterruptedException e) {}
        }
    }


    /**
     * Scrolls the bottom button left and right.
     */

    private void runBottom()
    {
        int counter = 0;

        while (true)
        {
            int offset = BOUNCE_SPACE_2 + (int)
                (BOUNCE_SPACE_2 * Math.sin(0.01 * Math.PI * counter++));

            layout.setColumn(0, offset);
            layout.setColumn(2, BOUNCE_SPACE - offset);
            container.invalidate();
            container.validate();

            try {Thread.sleep(DELAY);} catch (InterruptedException e) {}
        }
    }


}
|
Making an entrance
In this example we take the web page viewer from previous examples
and add some scrolling effects. First we scroll the banner down
from the top of the window. Then we scroll the left navigation
menu from the left edge of the window. The scrolling effects are
done with the following code.
        // Heading
        Dimension d = heading.getPreferredSize();
        for (int i = 0; i < d.height; i++)
        {
            layout.setRow(0, i);
            container.invalidate();
            container.validate();
            sleep();
        }
        layout.setRow(0, TableLayout.PREFERRED);

        // Left menu
        d = leftMenu.getPreferredSize();
        for (int i = 0; i < d.width - 1; i += 2)
        {
            layout.setColumn(0, i);
            container.invalidate();
            container.validate();
            heading.repaint();
            sleep();
        }
        layout.setColumn(0, TableLayout.PREFERRED);
After scrolling a row or column, we lock it to its preferred size
with lines like layout.setRow(0, i);. So when the
window is resized, the layout is what we expect.
There are many more special effects you can add to an application
using TableLayout. When toggling between sets of controls instead
of instaneously switching from one set to the other, you could
shrink away the first set and then grow the second one. The
possibilites are limited only by imagination.
Listing 9: Making an Entrance

package example2;


import java.awt.*;
import java.awt.event.*;
import java.io.*;
import java.net.*;
import java.util.*;
import javax.swing.*;
import javax.swing.event.*;
import javax.swing.tree.*;
import info.clearthought.layout.*;


/**
 * BorderLeftMenu extends the BorderStatus demonstration by adding a left
 * navigation menu.
 *
 * @author  Daniel E. Barbalace
 * @version 1.0, Jun 17, 2005
 */

public class Scrolling2 implements ActionListener, TreeSelectionListener
{


    /** Main frame */
    private JFrame frame;

    /** Main container */
    private Container container;

    /** Heading */
    private Heading heading;

    /** Used to display the path of the file being displayed */
    private JLabel labelFilename;

    /** When selected, files will be displayed as web pages */
    private JRadioButton radioWebPage;

    /** When selected, files will be displayed as text */
    private JRadioButton radioText;

    /** Used to display HTML files as web pages */
    private JEditorPane paneWeb;

    /** Used to display HTML files as text */
    private JTextPane paneText;

    /** Used to scroll document view */
    private JScrollPane scrollPane;

    /** Open file menu item */
    private JMenuItem menuOpenFile;

    /** Open URL item */
    private JMenuItem menuOpenUrl;

    /** Exit menu item */
    private JMenuItem menuExit;

    /** Status bar */
    private StatusBar statusBar;

    /** Left navigation menu */
    private JTree leftMenu;

    /** Layout used by the frame */
    private TableLayout layout;


    /**
     * Runs the program.
     */

    public static void main (String args[])
    {
        new Scrolling2();
    }


    /**
     * Creates the application's GUI.
     */

    public Scrolling2()
    {
        // Create frame
        frame = new JFrame("Border with a heading, status bar, and left menu");
        frame.setDefaultCloseOperation(JFrame.EXIT_ON_CLOSE);

        // Create menu
        JMenuBar menuBar = new JMenuBar();
        JMenu menu = new JMenu("File");
        menuOpenFile = menu.add("Open File");
        menuOpenUrl = menu.add("Open URL");
        menuExit = menu.add("Exit");
        menuOpenFile.addActionListener(this);
        menuOpenUrl.addActionListener(this);
        menuExit.addActionListener(this);
        menuBar.add(menu);
        frame.setJMenuBar(menuBar);

        // Create controls
        heading = new Heading();
        JLabel labelFile = new JLabel("File:");
        labelFilename = new JLabel("");
        JLabel labelView = new JLabel("View as:");
        radioWebPage = new JRadioButton("Web Page");
        radioText = new JRadioButton("Text");
        ButtonGroup groupView = new ButtonGroup();
        groupView.add(radioWebPage);
        groupView.add(radioText);
        radioWebPage.setSelected(true);
        radioWebPage.addActionListener(this);
        radioText.addActionListener(this);
        paneWeb = new JEditorPane();
        paneWeb.setEditable(false);
        paneText = new JTextPane();
        paneText.setEditable(false);

        scrollPane = new JScrollPane(paneWeb);
        scrollPane.setVerticalScrollBarPolicy(JScrollPane.VERTICAL_SCROLLBAR_ALWAYS);
        scrollPane.setPreferredSize(new Dimension(600, 400));
        scrollPane.setMinimumSize(new Dimension(10, 10));

        statusBar = new StatusBar();

        Vector v = new Vector();
        v.add("/sample.html");
        v.add("/hypercube.html");
        v.add("/itox.html");
        v.add("/TableLayout.html");
        v.add("/feedback.html");
        leftMenu = new JTree(v);
        leftMenu.addTreeSelectionListener(this);

        Color backgroundColor = new Color(26, 80, 184);
        DefaultTreeCellRenderer renderer = new DefaultTreeCellRenderer();
        renderer.setTextNonSelectionColor(Color.WHITE);
        renderer.setBackground(backgroundColor);
        renderer.setBackgroundNonSelectionColor(backgroundColor);
        leftMenu.setCellRenderer(renderer);
        leftMenu.setBackground(backgroundColor);

        // Create and set layout
        double p = TableLayout.PREFERRED;
        double border = 10;
        double [] columnSize =
            {p, border, border, p, p, p, TableLayout.FILL, border};
        double [] rowSize = {p, border, p, p, TableLayout.FILL, border, p};
        layout = new TableLayout(columnSize, rowSize);
        layout.setHGap(5);
        container = frame.getContentPane();
        container.setLayout(layout);

        // Add controls
        container.add(heading,       "0, 0, 7, 0");
        container.add(labelFile,     "3, 2, RIGHT, BOTTOM");
        container.add(labelFilename, "4, 2, 6, 2");
        container.add(labelView,     "3, 3, RIGHT, BOTTOM");
        container.add(radioWebPage,  "4, 3");
        container.add(radioText,     "5, 3");
        container.add(scrollPane,    "3, 4, 6, 4");
        container.add(statusBar,     "0, 6, 7, 6");
        container.add(leftMenu,      "0, 1, 0, 5");

        // Show one html file by default
        setPath("/sample.html");

        // Inititialize frame and layout for transitions
        Component [] c = {labelFile, labelFilename, labelView, radioWebPage,
            radioText, scrollPane};
        for (int i = 0; i < c.length; i++)
            c[i].setVisible(false);

        frame.pack();
        layout.setRow(0, 0);
        layout.setColumn(0, 0);

        // Show frame
        frame.setVisible(true);
        frame.toFront();

        // Transitions
        performTransitions();
        for (int i = 0; i < c.length; i++)
            c[i].setVisible(true);
    }


    /**
     * Performs the initial layout transitions.
     */

    private void performTransitions()
    {
        // Heading
        Dimension d = heading.getPreferredSize();
        for (int i = 0; i < d.height; i++)
        {
            layout.setRow(0, i);
            container.invalidate();
            container.validate();
            sleep();
        }
        layout.setRow(0, TableLayout.PREFERRED);

        // Left menu
        d = leftMenu.getPreferredSize();
        for (int i = 0; i < d.width - 1; i += 2)
        {
            layout.setColumn(0, i);
            container.invalidate();
            container.validate();
            heading.repaint();
            sleep();
        }
        layout.setColumn(0, TableLayout.PREFERRED);
    }


    /**
     * Waits for a standard amount of time.
     */

    private void sleep()
    {
        try
        {
            Thread.sleep(1);
        }
        catch (InterruptedException e) {}
    }


    /**
     * Sets the path of the document to view.
     *
     * @param path    full or relative path of document
     */

    private void setPath (String path)
    {
        // Attempt to open file in jar
        URL url = Scrolling2.class.getResource(path);

        // Attempt to open a full URL
        if (url == null)
        {
            try
            {
                url = new URL(path);
            }
            catch (MalformedURLException e) {}
        }

        // Attempt to open a local file
        if (url == null)
        {
            try
            {
                File file = new File(path);
                url = file.toURL();
            }
            catch (MalformedURLException e) {}
        }

        // If any of the attempts succeeded, open the url
        if (url != null)
        {
            try
            {
                paneWeb.setPage(url);
                paneText.setText(getContent(url));
                labelFilename.setText(path);
                statusBar.setText("Loaded " + url);
            }
            catch (IOException e)
            {
                paneWeb.setText("");
                paneText.setText("");
                labelFilename.setText("");
                statusBar.setText("Attempted to read a bad URL: " + url);
            }
        }
        else
        {
            statusBar.setText("Couldn't find file: " + path);
        }
    }


    /**
     * Gets the contents of a URL as a string.
     *
     * @param url    document to get
     *
     * @return a string containing the URL's contents
     */

    private String getContent (URL url)
    {
        StringBuffer content = new StringBuffer();

        try
        {
            String line = "";
            BufferedReader input = new BufferedReader(new InputStreamReader(url.openStream()));

            while (line != null)
            {
                content.append(line);

                if (line.length() > 0)
                    content.append('\n');

                line = input.readLine();
            }

            input.close();
        }
        catch (MalformedURLException me) {}
        catch (IOException e) {}

        return content.toString();
    }


    /**
     * Invoked when one of the radio buttons is selected.
     */

    public void actionPerformed (ActionEvent e)
    {
        Object source = e.getSource();

        if (source == radioWebPage)
            scrollPane.setViewportView(paneWeb);
        else if (source == radioText)
            scrollPane.setViewportView(paneText);
        else if (source == menuOpenFile)
        {
            JFileChooser fc = new JFileChooser();
            int returnVal = fc.showOpenDialog(menuOpenFile);

            if (returnVal == JFileChooser.APPROVE_OPTION)
            {
                File file = fc.getSelectedFile();
                   setPath(file.getPath());
            }
        }
        else if (source == menuOpenUrl)
        {
            String message = "URL to open";
            String s = (String) JOptionPane.showInputDialog
                (frame, message, "Open URL", JOptionPane.PLAIN_MESSAGE, null, null, null);

            if ((s != null) && (s.length() > 0))
                setPath(s);
        }
        else if (source == menuExit)
            System.exit(0);
    }


    /**
      * Invoked when the value of the left menu changes.
      */

    public void valueChanged (TreeSelectionEvent e)
    {
        TreePath path = e.getNewLeadSelectionPath();
        Object [] array = path.getPath();
        String item = (array.length == 2) ? "" + array[1] : "";

        if (item.length() > 0)
            setPath(item);
    }


    /**
     * A simple graphic to display at the top of the GUI, just below the menu
     * bar.
     */

    private class Heading extends Component
    {
        public Dimension getPreferredSize()
        {
            FontMetrics fm = getFontMetrics(getFont());
            return new Dimension(400, fm.getHeight() * 3);
        }

        public void paint (Graphics g)
        {
            Dimension d = getSize();
            Graphics2D g2 = (Graphics2D) g;
            GradientPaint gradient = new GradientPaint
                (leftMenu.getSize().width, 0, new Color(26, 80, 184),
                 d.width, 0, frame.getBackground(), false);
            g2.setPaint(gradient);
            g2.fill(new Rectangle(d.width, d.height));

            g2.setPaint(Color.white);
            int x = 0;
            int i = 0;
            String [] letter = {"J", "a", "v", "a"};

            // Some optimizing done since we will call this method often
            // during the transitions
            double coeff = 0.02 * Math.PI;
            double vMax = 0.25 * d.height;
            double phaseDelta = coeff * 10;
            double phase = 0;

            double [] offset = new double[10];
            for (int c = 0; c < 10; c++)
            {
                offset[c] = vMax * Math.sin(phase);
                phase += phaseDelta;
            }

            int c = 0;
            int halfHeight = d.height >> 1;

            while (x < d.width)
            {
                g2.translate(x, offset[c]);
                g2.drawString(letter[i++], 0, halfHeight);
                g2.translate(-x, -offset[c++]);
                x += 10;

                if (i == letter.length)
                    i = 0;

                if (c == 10)
                    c = 0;
            }
        }
    }


    /**
     * A simple status bar.
     */

    private class StatusBar extends Component
    {
        private String text = "";

        public StatusBar()
        {
            setForeground(Color.BLACK);
            setBackground(Color.LIGHT_GRAY);
        }

        public void setText (String text)
        {
            if (text != null)
            {
                this.text = text;
                repaint();
            }
        }

        public String getText()
        {
            return text;
        }

        public Dimension getPreferredSize()
        {
            FontMetrics fm = getFontMetrics(getFont());
            int width = fm.stringWidth(text) + 4;
            int height = fm.getMaxAscent() + fm.getMaxDescent() + 2;
            return new Dimension(width, height);
        }

        public void paint (Graphics g)
        {
            FontMetrics fm = getFontMetrics(getFont());
            Dimension d = getSize();
            int baseline = d.height - fm.getMaxDescent() - 1;

            g.setColor(getBackground());
            g.fillRect(0, 0, d.width, d.height);
            g.setColor(getForeground());
            g.drawString(text, 2, baseline);

            g.setColor(Color.black);
            g.drawRect(0, 0, d.width - 1, d.height - 1);
        }
    }


}
|
Finale
Component Orientation
Internationalization of applications has become important, and some
languages are read right to left. The AWT framework provides a
mechanism for handling such languages. It is called component
orientation. (See
Component Orientation in Swing for details.) Component
orientation affects layouts because components are supposed to be
laid out in the same orientation as their container. That means
in a left-to-right container the OK button is left of the Cancel
button, but in a right-to-left container the OK button is on the
right hand side.
TableLayout has built in support for component orientation. This
support was added without compromising compatibility with older
JDKs that do not have component orientation.
The ComponentOrientation class has three constants:
LEFT_TO_RIGHT, RIGHT_TO_LEFT, UNKNOWN.
The default value for any container is UNKNOWN, which is equivalent
to LEFT_TO_RIGHT so as to preserve the behavior of existing
applications. There is no TOP_TO_BOTTOM or BOTTOM_TO_TOP constants.
Furthermore, the ComponentOrientation class is final
and has a single private constructor to prevent developers from
creating new orientations. Nevertheless, TableLayout supports and
has been tested with all possible permutations including the ones
not currently available.
TableLayout introduces two new justifications to support component
orientation: LEADING and TRAILING. The
leading justification aligns components along the leading edge of
a cell or group of cells. For LTR languages, this is the left edge.
For RTL languages, this is the right edge. The trailing
justification aligns components along the trailing (opposite) edge.
Since the ComponentOrientation class lacks a
isTopToBottom method, these two constants can only be applied
to the horizontal justification of a component.
It is recommended that any application wishing to support
Internationalization used the LEADING and TRAILING constants instead
of LEFT and RIGHT. Porting an existing application to use these
constants is not difficult, but using the constants from the start
of development puts the developer in the right frame of mind.
The application below demonstrates the use of component orientation
with TableLayout. The user can change the orientation with the
window's menu.
Listing 10: Component Orientation

package example2;


import java.awt.*;
import java.awt.event.*;
import javax.swing.*;
import info.clearthought.layout.TableLayout;


/**
 * This example shows how to use component orientation and the corresponding
 * justifications.
 *
 * @author  Daniel E. Barbalace
 * @version 1.0, Jun 27, 2005
 */

public class Bidi implements ActionListener
{


    /** Application's frame */
    private JFrame frame;

    /** Menu to select left to right component orientation */
    private JMenuItem menuLtr;

    /** Menu to select right to left component orientation */
    private JMenuItem menuRtl;

    /** Menu to select the unknown component orientation */
    private JMenuItem menuUnknown;


    /**
     * Runs the program.
     */

    public static void main (String args[])
    {
        new Bidi();
    }


    /**
     * Creates the application's GUI.
     */

    public Bidi()
    {
        // Create frame
        frame = new JFrame("Component Orientation and Bidirectional Support");
        frame.setDefaultCloseOperation(JFrame.EXIT_ON_CLOSE);
        Container pane = frame.getContentPane();

        // Create menu
        JMenuBar menuBar = new JMenuBar();
        frame.setJMenuBar(menuBar);
        JMenu menu = new JMenu("Component Orientation");
        menuBar.add(menu);
        menuLtr = new JCheckBoxMenuItem("Left to right");
        menuRtl = new JCheckBoxMenuItem("Right to left");
        menuUnknown = new JCheckBoxMenuItem("Unknown");
        menu.add(menuLtr);
        menu.add(menuRtl);
        menu.add(menuUnknown);
        menuLtr.addActionListener(this);
        menuRtl.addActionListener(this);
        menuUnknown.addActionListener(this);
        menuLtr.setSelected(true);

        // Create all controls
        JLabel labelName    = new JLabel("Name");
        JLabel labelAddress = new JLabel("Address");
        JLabel labelCity    = new JLabel("City");
        JLabel labelState   = new JLabel("State");
        JLabel labelZip     = new JLabel("Zip");

        JTextField textfieldName    = new JTextField(10);
        JTextField textfieldAddress = new JTextField(20);
        JTextField textfieldCity    = new JTextField(10);
        JTextField textfieldState   = new JTextField(2);
        JTextField textfieldZip     = new JTextField(5);

        JButton buttonOk = new JButton("OK");
        JButton buttonCancel = new JButton("Cancel");
        JPanel panelButton = new JPanel();
        panelButton.add(buttonOk);
        panelButton.add(buttonCancel);

        // Create and set layout
        // b - border
        // f - FILL
        // p - PREFERRED
        // vs - vertical space between labels and text fields
        // vg - vertical gap between form elements
        // hg - horizontal gap between form elements

        double b = 10;
        double f = TableLayout.FILL;
        double p = TableLayout.PREFERRED;
        double vs = 5;
        double vg = 10;
        double hg = 10;

        double size[][] =
            {{b, f, hg, p, hg, p, b},
             {b, p, vs, p, vg, p, vs, p, vg, p, vs, p, vg, f, p, b}};

        TableLayout layout = new TableLayout(size);
        pane.setLayout (layout);

        // Add all controls
        pane.add(labelName,        "1,  1, 5, 1, LEADING, BOTTOM");
        pane.add(textfieldName,    "1,  3, 5, 3");
        pane.add(labelAddress,     "1,  5, 5, 5, LEADING, BOTTOM");
        pane.add(textfieldAddress, "1,  7, 5, 7");
        pane.add(labelCity,        "1,  9, LEADING, BOTTOM");
        pane.add(textfieldCity,    "1, 11");
        pane.add(labelState,       "3,  9, LEADING, BOTTOM");
        pane.add(textfieldState,   "3, 11, LEADING, BOTTOM");
        pane.add(labelZip,         "5,  9, LEADING, BOTTOM");
        pane.add(textfieldZip,     "5, 11");
        pane.add(panelButton,      "1, 14, 5, 14");

        frame.pack();
        frame.setResizable(false);
        frame.setVisible(true);
    }


    /**
     * Invoked when one of the menu items is selected.
     */

    public void actionPerformed (ActionEvent e)
    {
        Object source = e.getSource();

        if (source == menuLtr)
        {
            frame.applyComponentOrientation(ComponentOrientation.LEFT_TO_RIGHT);
            menuLtr.setSelected(true);
            menuRtl.setSelected(false);
            menuUnknown.setSelected(false);
        }
        else if (source == menuRtl)
        {
            frame.applyComponentOrientation(ComponentOrientation.RIGHT_TO_LEFT);
            menuLtr.setSelected(false);
            menuRtl.setSelected(true);
            menuUnknown.setSelected(false);
        }
        else if (source == menuUnknown)
        {
            frame.applyComponentOrientation(ComponentOrientation.UNKNOWN);
            menuLtr.setSelected(false);
            menuRtl.setSelected(false);
            menuUnknown.setSelected(true);
        }

        frame.invalidate();
        frame.validate();
    }


}
|
Grid Class
Sometimes it is useful to see the grid being used by an instance of
TableLayout. The following class will allow you to see the grid
in any container you wish. Running the main method of this class
without any parameters will show the grid and the gaps in the
Multicell justification example application. The output is shown
below.

Listing 11: Seeing the Grid

package example2;


import java.awt.*;
import java.lang.reflect.*;
import javax.swing.*;
import info.clearthought.layout.*;


/**
 * This class can show a grid on top of any container that uses TableLayout.
 *
 * @author  Daniel E. Barbalace
 * @version 1.0, Jun 14, 2005
 */

public final class Grid extends Component
{


    private static Color gridColor = Color.BLACK;
    private static Color fillColor = null;


    /**
     * Runs the program.
     */

    public static void main (String args[])
    {
        setFillColor(Color.BLUE);
        String className = "example2.MulticellJustify";

        if (args.length == 1)
            className = args[0];

        try
        {
            Class cls = Class.forName(className);
            Class [] parameterType = {args.getClass()};
            Object [] parameter = {new String[0]};
            Method method = cls.getMethod("main", parameterType);
            method.invoke(null, parameter);

            Frame [] frame = Frame.getFrames();

            if (frame.length == 1)
            {
                if (frame[0] instanceof JFrame)
                    showGrid(((JFrame) frame[0]).getContentPane());
                else
                    showGrid(frame[0]);
            }
        }
        catch (Exception e)
        {
            e.printStackTrace();
        }
    }


    /**
     * Shows a grid on a given container provided that the container uses
     * TableLayout.
     *
     * @param container    container using TableLayout.  May not be null.
     */

    public static void showGrid (Container container)
    {
        if (container == null)
            throw new IllegalArgumentException("Parameter container cannot be null");

        LayoutManager l = container.getLayout();

        if (!(l instanceof TableLayout))
            throw new IllegalArgumentException("Container is not using TableLayout");

        TableLayout layout = (TableLayout) l;

        showGrid(container, layout);

        container.invalidate();
        container.validate();
        container.repaint();
    }


    /**
     * Shows a grid on a given container provided that the container uses
     * TableLayout.
     *
     * @param container    container using TableLayout.  May not be null.
     * @param layout       TableLayout instance used by container.  May not be null.
     */

    private static void showGrid (Container container, TableLayout layout)
    {
        int numRow = layout.getNumRow();
        int numCol = layout.getNumColumn();

        for (int y = 0; y < numRow; y++)
            for (int x = 0; x < numCol; x++)
            {
                Grid g = new Grid();
                container.add(g, new TableLayoutConstraints(x, y), 0);
            }
    }


    /**
     * Gets the grid color.
     *
     * @return the grid color
     */

    public static Color getGridColor()
    {
        return gridColor;
    }


    /**
     * Sets the grid color.
     *
     * @param color    new grid color
     */

    public static void setGridColor (Color color)
    {
        gridColor = color;
    }


    /**
     * Gets the fill color.
     *
     * @return the fill color
     */

    public static Color getFillColor()
    {
        return fillColor;
    }


    /**
     * Sets the fill color.
     *
     * @param color    new fill color
     */

    public static void setFillColor (Color color)
    {
        fillColor = color;
    }


    /**
     * Prevent creation of instances outside of this class.
     */

    private Grid()
    {
    }


    /**
     * Renders the component.
     *
     * @param g    graphics canvas
     */

    public void paint (Graphics g)
    {
        Dimension d = getSize();

        if (gridColor != null)
        {
            g.setColor(gridColor);
            g.drawRect(0, 0, d.width - 1, d.height - 1);
        }

        if (fillColor != null)
        {
            Graphics2D g2d = (Graphics2D) g;
            g2d.setComposite
                (AlphaComposite.getInstance(AlphaComposite.SRC_OVER, 0.25f));
            g2d.setPaint(fillColor);
            g2d.fill(new Rectangle(1, 1, d.width - 1, d.height - 1));
        }
    }


}
|
Conclusion
I hope you've enjoyed this second installment of the TableLayout
Tutorial series. We have covered more advance TableLayout
techniques. First we saw how to make components span rows and
columns and how to justify those components. Next we examined how
to create various borders, status bars, screen headings, and
left navigation panels. We saw a powerful technique for simplifying
user interfaces by toggle the visibility of groups of controls based
on choices made earlier by the user. We added some special effects
to our layouts to make them more visually impressive. We used new
justifications for component orientation. Finally, we wrote a
class to display the grid in any window or container using
TableLayout.
TableLayout offers unprecedented power in crafting user interfaces
without complications, awkward coding, or nesting containers.
A simple yet effective API allows novices to quickly write
interfaces and enables veterans to create professional and dynamic
interfaces. Layouts that take hours to build with other managers
are built in minutes, and layouts that were inconceivable become
easy.
|
 java.net RSS

